Honeycomb Bravo – FBW A32NX – AutoThrust (Button 4)

In this tutorial I would like to show you how to use the autopilot “REV” button on your Honeycomb Bravo Quadrant Throttle as an autothrust switch. Of course you can also use one of the other buttons. For the following setup you need the following:
- The Microsoft Flight Simulator 2020 (subject to a fee), available e.g. at Amazon
- A Honeycomb Bravo Throttle Quadrant (subject to a charge), available e.g. at Amazon
- The FlyByWire A32NX (free), download from FlyByWire Simulations
- Spad.Next (paid) [for option 2, 3], downloadable/purchasable from Spad.Next
- Better Bravo Lights (free) [for option 1, 2], download via Flightsim.to or Github website
The various options are partially stored with images to make the configuration as easy as possible for you.
Option 1 (MSFS & Better Bravo Lights)
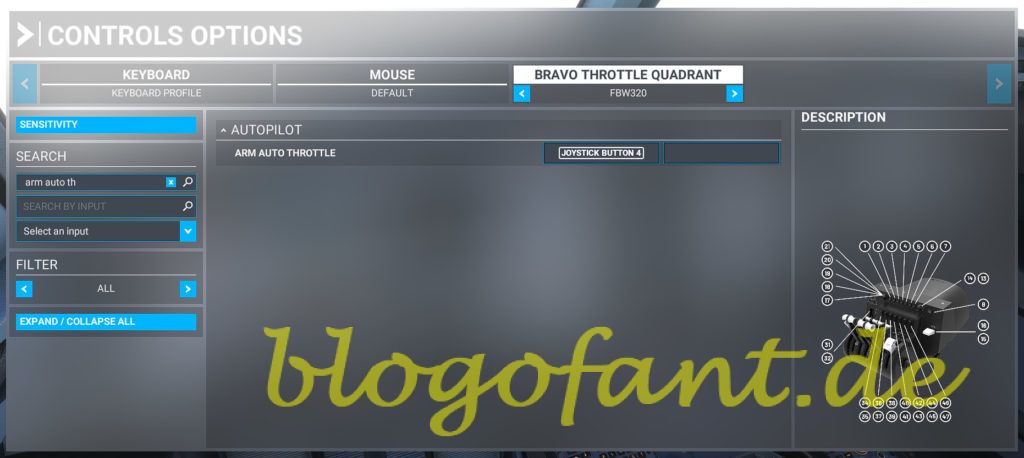
The first option is to use the key combination to turn AutoThrust on or off in the flight simulator settings. It is advisable to create a separate profile per hardware unit for each aircraft, in this case I created the profile FBW320. You can find the settings under Settings >> ControlOptions>> Bravo Throttle Quadrant >> Autopilot >> Arm Auto Throttle.
You can then enter “Arm Auto Throttle” in the search field and assign Button 4 to the joystick. Button 4 is the “REV” button on the Honeycomb Bravo. Each press of the button is equivalent to a mouse click on the “A/THR” button on the plane. With this first step you have already triggered the event, but the correct lighting display of the keyboard is still missing.
In the next step, the “REV” LED lamp should now light up when the AutoThrust is activated or go out when deactivated. Currently, however, the LED display is linked to REV (Back Course). This can be done with the Better Bravo Lights program.
After downloading Better Bravo Light, simply follow the installation instructions. Then in the community folder under BetterBravoLights (caution: do not use the folder Better-Bravo-Lights-LVAR-Module) a file called Config.ini. The LED lamps can now be adjusted here, in our case for the A32NX. For this we add the next two lines:
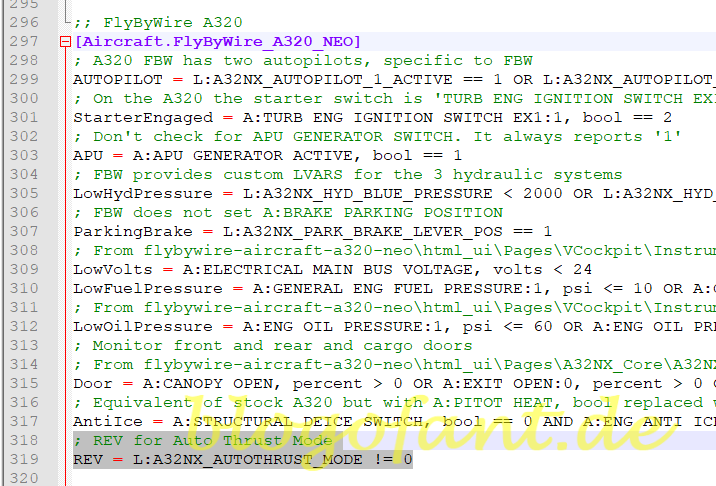
; REV for Auto Thrust Mode
REV = L:A32NX_AUTOTHRUST_MODE != 0
The first line is a comment. REV is the designation for the “REV” LED. In the second line we tell the application when the LED should light up. In this case, the LED lights up when the Autothrust Mode does not correspond to the parameter 0 (AutoThrust OFF) [“!=” corresponds to “is not”]. This is a FlyByWire LVAR (variable). With this option, it doesn’t matter whether you activate or deactivate the AutoThrust via mouse, keyboard or Honeycomb Bravo, the LED switches automatically.
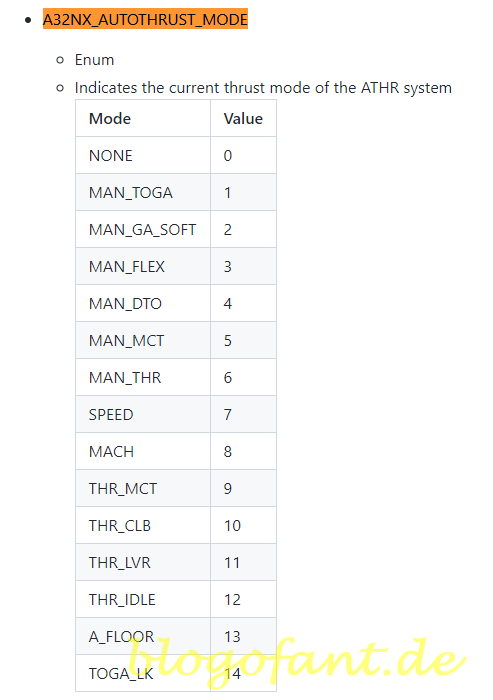
The various events and variables can be found in the FlyByWire API documentation. It can be seen that the AutoThrust is only switched off with a value of 0, otherwise switched on.
Option 2 (Spad.Next & Better Bravo Lights)
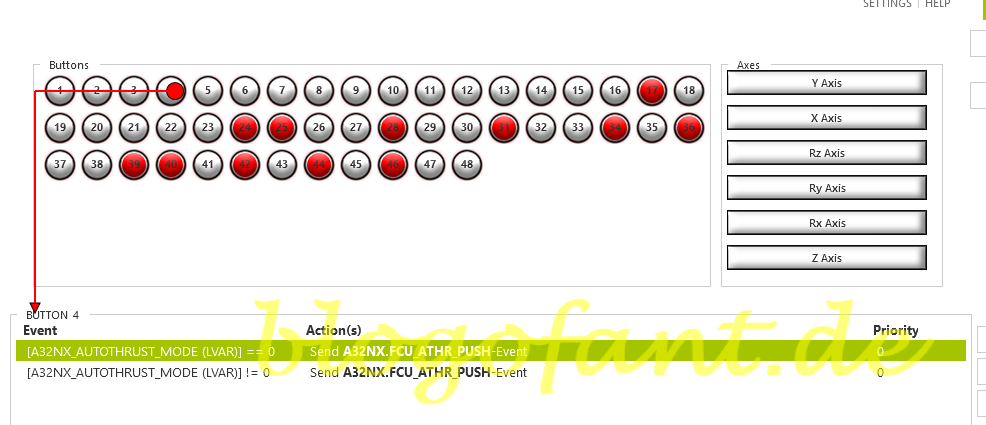
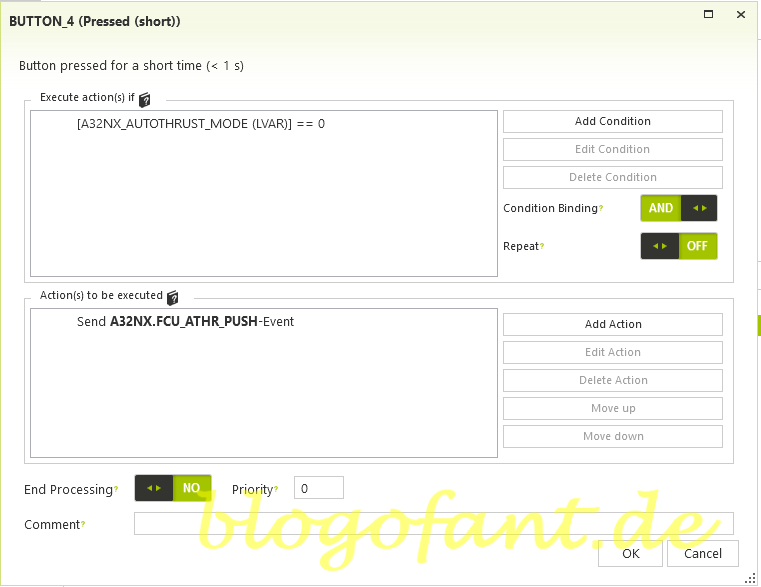
Instead of doing the AutoThrust via the flight simulator, Spad.Next can also be accessed. A key event is sent by FlyByWire for the A32NX. The key event (like a key press) causes the A/THR button to be pressed. If the button is activated, it will be deactivated and vice versa. The separation (condition) in the images below is not necessary, an action with SEND A32NX.FCU_ATHR_PUSH-Event is sufficient.
In the next step, the “REV” LED lamp should now light up when the AutoThrust is activated or go out when deactivated. Currently, however, the LED display is linked to REV (Back Course). This can be done with the Better Bravo Lights program.
After downloading Better Bravo Light, simply follow the installation instructions. Then in the community folder under BetterBravoLights (caution: do not use the folder Better-Bravo-Lights-LVAR-Module) a file called Config.ini. The LED lamps can now be adjusted here, in our case for the A32NX. For this we add the next two lines:
; REV for Auto Thrust Mode
REV = L:A32NX_AUTOTHRUST_MODE != 0
The first line is a comment. REV is the designation for the “REV” LED. In the second line we tell the application when the LED should light up. In this case, the LED lights up when the Autothrust Mode does not correspond to the parameter 0 (AutoThrust OFF) [“!=” corresponds to “is not”]. This is a FlyByWire LVAR (variable). With this option, it doesn’t matter whether you activate or deactivate the AutoThrust via mouse, keyboard or Honeycomb Bravo, the LED switches automatically.

The various events and variables can be found in the FlyByWire API documentation. It can be seen that the AutoThrust is only switched off with a value of 0, otherwise switched on.

Option 3 (Spad.Next)
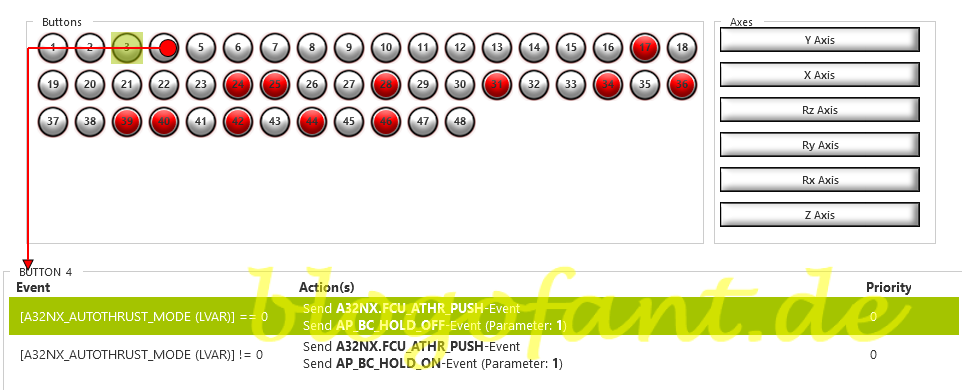
The last option only works if you are only playing with the Bravo Throttle quadrant and are not using the mouse or keyboard to autothrust. The LED lights are displayed via the actual “REV / Back Course” function. This means if you operate the switch with the mouse or keyboard, or if A/THR is automatically disabled, the REV light on the Bravo will still be lit. It is therefore the worst option and therefore not recommended. I included it anyway to show you the configuration behind it.
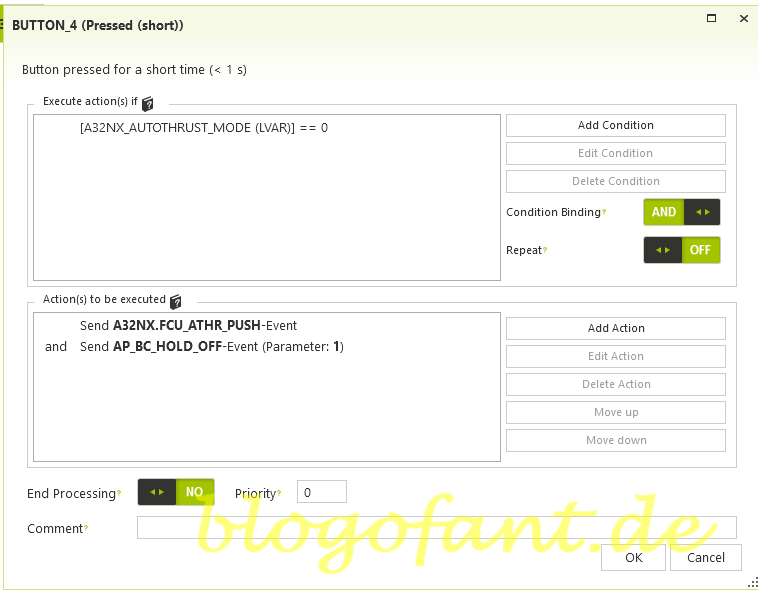
The first step is to determine whether AutoThrust is enabled or disabled (condition). This works via the variable A32NX_AUTOTHRUST_MODE. A value of 0 means A/THR is disabled, any other number would mean enabled (in various modes). As in option 2, we always send a key event to the A32NX so that the button is pressed (SEND A32NX.FCU_ATHR_PUSH event).
In order to control the LED we now also have to activate or deactivate the REV (Back Course) mode. In the A32NX this has no effect, which is why we can do this without further ado (as of January 2022). This time the events are via the SimConnect interface and are AP.BC_HOLD_OFF or AP.BC_HOLD_ON with the parameter 1. So as soon as Back Course is active, A/THR should also be lit and thus also the REV light on the Honeycomb Bravo.
More configurations
- Configure the autopilot
- Configuration for SeatBelts
- Configuration for AutoBrakes
- Configuration for the APU
- Configure A/THR
- Configure for taxi lights
- Configure for landing lights
- Configuring flaps & spoilers
- Configuration in MSFS
- To the overview page of the configuration of the A32NX
- Key Map / Button Map Honeycomb Bravo
More about the Honeycomb Bravo Throttle Quadrant
More about the Honeycomb Bravo Throttle Quadrant can be found on the Honeycomb Bravo Throttle Quadrant Overview Page, the Configuration page of the Honeycomb Bravo Throttle Quadrant for many other aircraft and the Honeycomb Bravo Throttle Quadrant Test and Recommendation.




2 Responses
[…] Not included are button 4 (REV) and button 18 (CRS selector), which I misused in another post for the A/THR or the AutoBreaks. More information on this in the article Honeycomb Bravo – FBW 32NX – AutoThrust (Button 4). […]
[…] Button 4 – REV Mode – Back Course / Reverse => Misuse for A/THR […]